Jan 23, 2026

-

Safety

Install of a backwater valve - protection against flood damage

Is your basement regularly flooded after heavy rain? A lot of flood damage is caused by missing backwater valves. Installed retrospectively, they reliably protect your house from flooding from below. Here you can find out everything you need to know about the installation and operation of backwater valves. This is how you prepare your house for the next downpour and avoid expensive water damage.

Retrofit backwater valve - Flooded basement

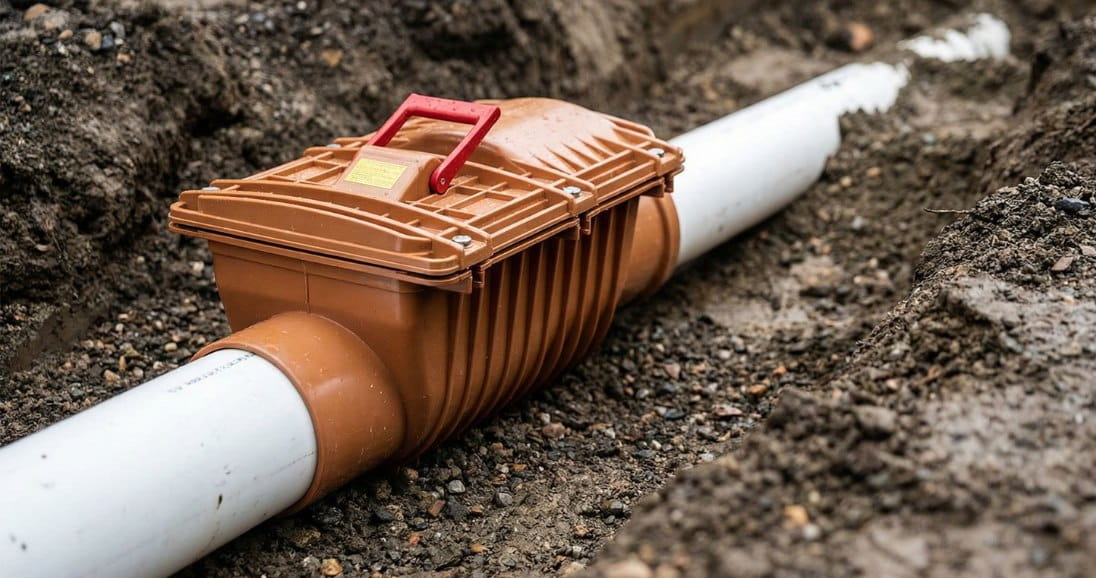
Why you should think about backwater valves

Let’s be honest: Nobody really wants to spend their Saturday morning thinking about sewage pipes. But then the sky turns dark, the clouds burst, and suddenly you’re standing ankle deep in "water" that definitely shouldn’t be in your basement. Not exactly a dream scenario, right? Installing a backwater valve is one of those "boring" DIY projects that can literally save your house.

Is your house at risk? Here’s a quick reality check:

  • • Basement below street level
  • • Valuable household goods or technology in the cellar
  • • Risk of flooding of rivers nearby

As a result, houses with basements lower than the road surface, for example, are particularly vulnerable. Heavy rain can cause backwater from the sewer system, forcing the water through the drains into the cellar. Houses near the river are also at risk if floods occur frequently.

In general, the subsequent installation of a backwater valve should also be considered for all buildings with valuable installations or stored household goods in the basement.

Backflow insurance is also a common requirement for elementary damage insurance. You should definitely check this in your documents.

Jetzt Haushaltsplan erstellen
Jetzt Aufräumplan erstellen
Jetzt Checkliste erstellen

How does a backwater valve actually work?

Think of a backwater valve (or backflow valve, as some call it) as a smart bouncer for your home’s plumbing. It’s essentially a specialized one-way flap installed right into your main sewer line. Its only job? Making sure that when the heavens open up and the city sewers get overwhelmed, the nasty mess stays where it belongs—outside.

Here’s the simple breakdown of the magic:

  • Business as usual: On a normal day, the valve just hangs out. Every time you flush the toilet or run the shower, the flap opens easily, letting the wastewater flow out to the sewer without a hitch.
  • The "Emergency" mode: When a heavy storm hits and water starts pushing back from the street, the pressure forces the flap shut instantly. It’s like a deadbolt for your pipes.
  • The secret sauce: Modern valves come equipped with high-tech silicone lip seals. These aren't just flimsy pieces of plastic; they’re designed to create a 100% airtight and watertight seal against that massive pressure from below.

Most of the time, these valves are installed vertically in your main drain line. The best part? They usually come with a clear cover or an easy-access hatch, so you can take a peek from above to make sure everything is clean and ready for action.

Homerockr kostenlos testen:
Laden im App StoreLaden im Google Play Store
installation of a baackwater valve

Free Checklist

Steps to install a backwater valve

Can you do this yourself? Absolutely. If you’re handy with tools and don’t mind getting your hands a little dirty. But a quick word of caution: if this thing isn't airtight, it won't work when it matters most. So, if you’re feeling unsure, it’s never a bad idea to have a pro take a look or handle the heavy lifting.

  • ✅ Expose pipe: Unless you’re installing the valve in an existing inspection chamber, you’ll need to find your main sewer line. You’ll need about 50 cm to 1 meter of clear pipe to work with. Look for a straight, accessible section in your basement. Yes, this might mean breaking out the tools to open up the floor or a bit of masonry.
  • ✅ Pick valve: You need a backwater valve that matches your pipe’s diameter perfectly. Also, double-check your flow direction—whether your pipe runs horizontally or vertically will determine which model you need.
  • ✅ Prepare the installation site: You’ll need to cut out a section of the existing pipe to make room for the valve. Precision is key here, so measure twice and cut once!
  • ✅ Check the seal: Before everything goes together, give the gaskets and seals a close look. Even a tiny nick can cause a leak later. If it looks dodgy, swap it out for a fresh one. A perfect seal is the only thing standing between you and a wet basement.
  • ✅ Lock it in: Slide the valve into place. Make sure it’s seated perfectly flush with the pipe, then tighten the included screws until everything is nice and snug.
  • ✅ Test function: Manually open and close the flap a few times. It should move smoothly without catching and snap shut completely. If it feels buttery soft and seals tight, you’re good to go.

💡 Backwater valve maintenance? Homerockr reminds you!

Mit der Homerockr-App organisierst du Wartung, Renovierung und kleine To-Dos am Haus mühelos. Behalte den Überblick, bevor aus kleinen Aufgaben große Kosten werden.

Infos zur Homerockr-App
Wartungsplan anlegen
Laden im App StoreLaden im Google Play Store
Homerockr App

What does it cost to install a backwater valve?

The backwater valve installation cost isn't "one size fits all". It depends on how easy it is to get to your pipes and where you live. While a basic valve unit starts at around $150 to $300, the total bill for a professional installation usually lands somewhere between $1,500 and $3,500.

Here’s the breakdown of what you’re actually paying for:

  • The Valve itself: You can find quality PVC valves for $150 – $300. If you need a more heavy-duty cast iron or stainless steel version, expect to pay a bit more.
  • Professional Labor: This is usually the biggest chunk. A licensed plumber will typically charge between $500 and $1,200 for the installation. If they have to jackhammer through your concrete basement floor to reach the main line, the labor hours (and the price) will climb.
  • Materials & Permits: Don’t forget the "little things"—seals, extra pipe fittings, and gravel. These add about $100 – $200. Also, many US cities require a plumbing permit for this kind of work, which can cost anywhere from $50 to $200 depending on your local building department.
  • The "Cleanup": Once the valve is in, you’ve got to put your basement back together. Patching concrete, replacing tiles, or fixing drywall can add another $300 – $700 to the total project cost.

💡Pro-Tip: Before you start, check with your city or local utility company. Some areas offer rebates or grants (sometimes up to 80% of the cost!) because they’d much rather help you install a valve than deal with the fallout of a flooded neighborhood. It’s definitely worth a five-minute phone call!

Maintaining your backwater valve

A backwater valve is pretty much a "set it and forget it" device - until it isn’t. To make sure it actually saves your skin when the next big storm hits, you’ve got to give it a little love every now and then. Think of it like a quick health check for your home’s defense system.

Add these quick steps to your semi-annual home maintenance checklist:

  • The Visual Check: At least every six months, pop the cover and take a look. You’re looking for any obvious signs of trouble: rust on metal parts, weird gunk buildup, or any signs of slow leaks.
  • The "Workout": Give the flap a few manual test runs. Open and close it several times. It should feel buttery smooth and it needs to snap shut completely. If it feels stiff or gritty, it’s time for a cleaning.
  • The Seal Test: Once the flap is closed, double-check that the seal is actually airtight. A tiny gap might not seem like much, but under high pressure, it’s an invitation for water to seep through.
  • Clear the Debris: Over time, sediment or "stuff" from your drains can settle around the valve. Give it a good wipe-down and remove any buildup so the mechanism stays free and easy.
  • Check the Hardware: Look at the screws and gaskets. If a seal looks cracked or worn out, swap it out. It’s a $10 fix that prevents a $10,000 disaster.

Homerockr Tip: Don’t wait for the rain to remind you! Set a recurring reminder using our Homerockr app.

A Quick Heads-Up (Disclaimer)

We love helping you keep your home in top shape, but please remember: this guide is for informational purposes only. Every house is different, and plumbing can be tricky. We can’t take responsibility for any DIY mishaps or water damage resulting from the installation. If you’re not 100% confident with a wrench (or a jackhammer), do your home a favor and call in a licensed professional.

Profilfoto

Author

Carsten Bohling

Carsten is a true DIY enthusiast who founded Homerockr in 2023 with a clear mission: to provide homeowners with deep expertise on everything related to their four walls. Here on the blog, he covers the full spectrum of homeownership, from essential maintenance and modern renovations to smart home solutions.

He dives deep into research to provide the Homerockr community with detailed, practical insights. When he’s not writing, he’s usually busy with his own DIY projects, where he’s often joined by his two sons.

If you have any questions or feedback, feel free to drop us a line at team@homerockr.com.

Want to stay on top of all your home maintenance tasks without the stress? Then sign up for the Homerockr app today and keep your home in perfect shape.

Homerockr – Never lose track of your home maintenance again!

Homerockr App
Laden im App StoreLaden im Google Play Store

Frequently Asked Questions

01.

Where is a backwater valve located?

It’s usually in your basement floor, installed on the main sewer line before it leaves the house. Look for a small access hatch or a plastic cover

02.

Is a backwater valve the same as a backflow preventer?

Technically, no. A backwater valve keeps sewage out of your basement during heavy rain. A backflow preventer usually protects your clean drinking water from contamination. Different pipes, different jobs!

03.

How much to install a backwater valve?

A professional installation typically costs between $1,500 and $3,500. This covers the valve, labor (like cutting through concrete), and any necessary permits to keep your basement dry and insured.